Moving your website to a new hosting provider can feel risky. If your website brings in leads, sales, bookings or enquiries, you cannot simply take it offline while you figure out the migration.
The good news is that you can migrate your website to new hosting without downtime when the migration is planned properly.
The key is not to move the live website first and troubleshoot later. Instead, you prepare the new hosting environment, copy your website, test everything, and only then change your DNS.
This guide explains how to migrate a website to a new hosting provider without downtime, what can go wrong, how the process affects SEO, and when it makes sense to get professional migration support.
Why Would a Business Change Its Hosting Provider?
Businesses usually do not change hosting providers for no reason.
You may be considering a hosting migration because your current hosting is:
- Making your website slow
- Experiencing frequent downtime
- Providing poor customer support
- Running out of storage or server resources
- Becoming expensive as your business grows
- Unable to handle increasing website traffic
- Missing features your website now requires
- Not providing enough security or backup options
For a small business, hosting requirements can change quickly.
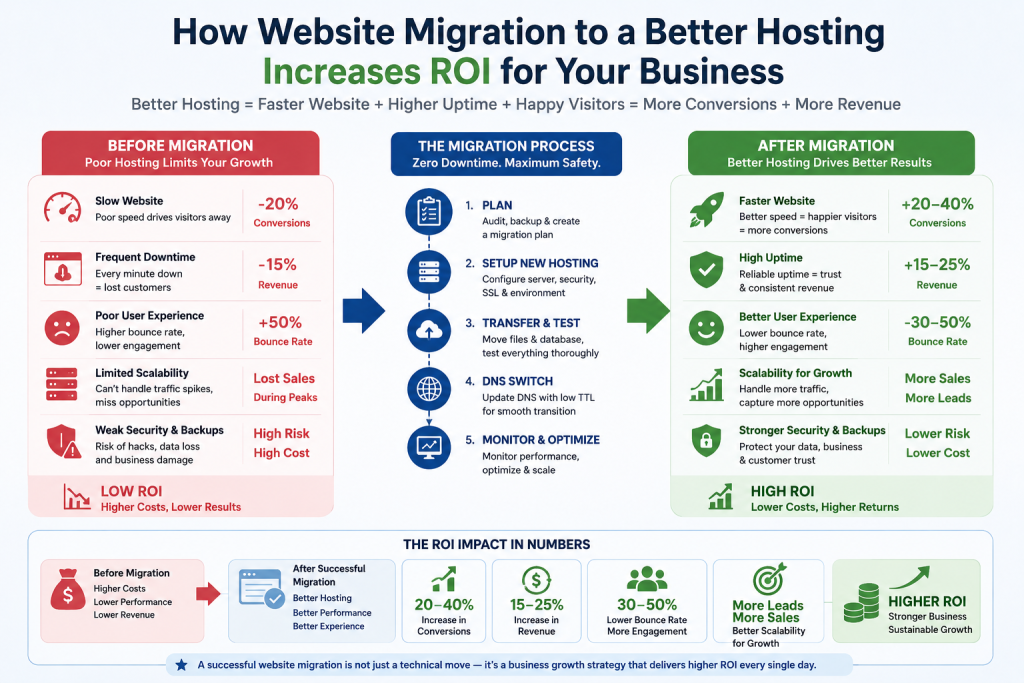
A website that worked perfectly when you launched your business may not be suitable after you start receiving more visitors, publishing more content, adding products or generating more enquiries.
That is when changing your hosting provider can make sense.
The goal should not simply be to find cheaper hosting.
The goal should be to find hosting that can support your website’s current requirements and future growth.
Can You Migrate a Website Without Downtime?
Yes, a properly planned migration can minimise or avoid visible downtime for visitors.
However, there is an important distinction.
You cannot control exactly when every DNS resolver around the internet updates its cached information. That is why a safe hosting migration keeps the old website available while the new hosting environment is being introduced.
The basic process is:
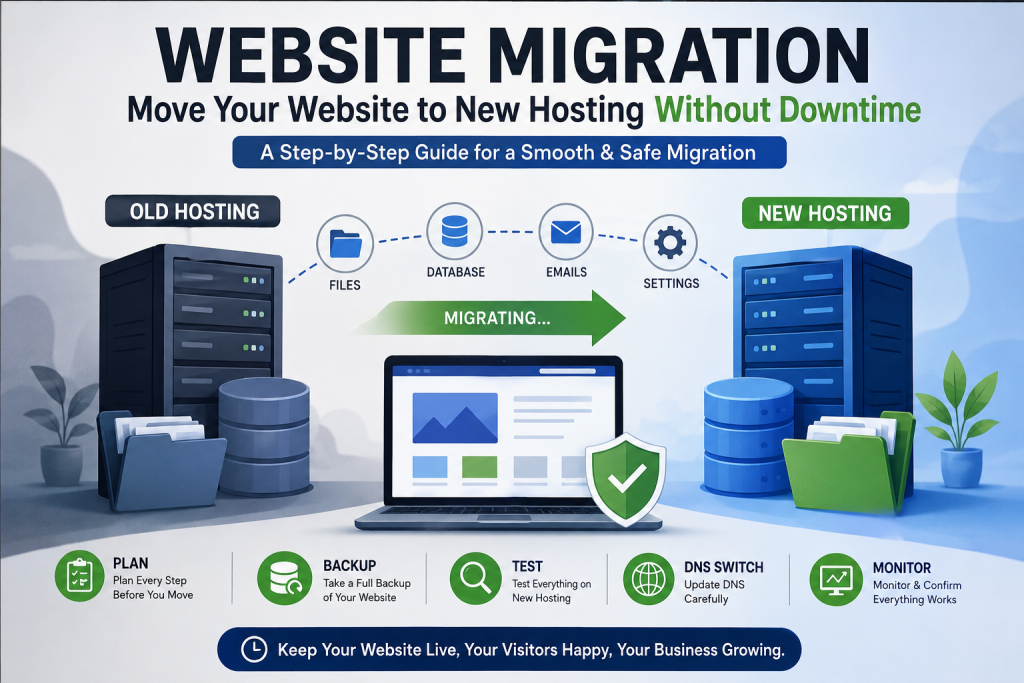
Current hosting → New hosting → Website testing → DNS change → Monitoring → Old hosting shutdown
Google’s current guidance follows essentially this sequence. For a hosting infrastructure change where the URLs remain the same, Google recommends preparing and testing the new hosting infrastructure, changing DNS, monitoring traffic on both environments and shutting down the old infrastructure only after the transition is confirmed.
So, if someone tells you:
“Just copy the website and change the nameservers.”
that is not a complete migration plan.
How to Migrate Your Website to New Hosting Without Downtime
1. Decide Why You Are Migrating
Before you change anything, identify the actual problem with your current hosting.
Ask:
Is the website slow?
Is the server frequently unavailable?
Are you running out of resources?
Is customer support poor?
Has your business outgrown shared hosting?
Do you need a VPS or another hosting environment?
This matters because your new hosting should solve the reason you are leaving the old provider.
There is little value in moving a slow website from one unsuitable hosting plan to another unsuitable hosting plan.
For example, a small business website may be comfortable on shared hosting, while a growing e-commerce website or web application may need more dedicated resources.
2. Choose the Right Hosting Plan
Once you know why you are migrating, choose the new hosting environment.
Look at more than the monthly price.
Consider:
Server resources
Check the available CPU, RAM and storage.
Storage technology
Modern websites can benefit from faster storage and properly configured server infrastructure.
Scalability
Ask whether you can upgrade resources when your website traffic increases.
Security
Look for SSL support, backups and appropriate security measures.
Support
If something goes wrong during a migration, technical support can make a significant difference.
Website compatibility
Make sure the new server supports the technology your website uses.
For example, WordPress, PHP applications and Microsoft-based applications can have different hosting requirements.
Choose hosting for the business you are building, not only the website you have today.
3. Create a Complete Backup
Before you migrate your website to new hosting, create a complete backup of your existing website.
This is your safety net.
Your backup should normally include:
Website files
Such as:
- HTML
- CSS
- JavaScript
- Images
- Documents
- Plugins
- Themes
- Uploads
- Configuration files
Database
If your website uses a database, back it up as well.
This can contain:
- Website content
- Products
- Orders
- Customer information
- Form submissions
- User accounts
- Website settings
DNS information
Make a record of your current DNS records.
Email information
If your email is connected to the same hosting provider, document the existing email configuration before making changes.
Do not assume that your hosting provider’s automatic backup is the only backup you need.
You should know where your own backup is and how it can be restored.
4. Set Up the New Hosting Account
Now create your account with the new hosting provider.
Do not cancel your existing hosting.
Your old website should continue working while you prepare the new one.
Set up the new environment based on your website’s requirements.
Depending on your website, this may include:
- Creating the hosting account
- Creating databases
- Setting the required PHP or server version
- Installing WordPress or another CMS
- Setting up SSL
- Configuring email
- Creating FTP or other access
- Configuring server settings
For a simple business website, this may be relatively straightforward.
For an e-commerce website, custom application or database-heavy website, the setup can be considerably more involved.
5. Transfer Your Website to the New Server
Now it is time to move your website to new hosting.
Transfer your website files and database to the new server.
For a simple website, this may involve copying the website files.
For a database-driven website, you may need to:
- Create a new database.
- Import your existing database.
- Upload your website files.
- Update configuration settings.
- Check database credentials.
- Check file permissions.
- Configure the required server environment.
- Install or configure SSL.
If you use WordPress, you may use a migration plugin, a hosting migration tool or a manual migration process.
The method is less important than the result:
The new server must contain a working copy of your website before you send real visitors there.
6. Test the New Website Before Changing DNS
This is probably the most important step in the entire migration.
Do not change your DNS just because the website has been uploaded.
Test it first.
Google recommends creating a testing environment or using a temporary hostname and thoroughly testing the new infrastructure before starting the hosting move.
Check:
Important pages
- Homepage
- About page
- Services
- Products
- Contact page
- Blog
- Landing pages
Important functions
- Contact forms
- Enquiry forms
- Login
- Registration
- Search
- Shopping cart
- Checkout
- Payment gateway
- Booking system
Website assets
- Images
- Videos
- PDFs
- Downloads
- Fonts
- Scripts
Mobile experience
Check the website on mobile devices as well as desktop.
Performance
Compare the new server’s performance with the old environment.
You do not want to migrate your website to a new host only to discover that it is slower.
7. Check Your SSL Certificate
Before you switch your website to the new hosting provider, check HTTPS.
Make sure:
- The SSL certificate is active
- HTTPS loads correctly
- Important pages work over HTTPS
- Forms work securely
- There are no obvious certificate warnings
- HTTP redirects correctly to HTTPS where required
A website that works on the old server does not automatically mean that SSL has been correctly configured on the new server.
Check it before the DNS switch.
8. Review Your DNS Records
DNS tells the internet where your domain should go.
Before changing anything, make a list of the DNS records currently being used.
These may include:
- A records
- AAAA records
- CNAME records
- MX records
- TXT records
- Subdomain records
This is particularly important for business email.
Your website may be moving to a new host while your email remains with another provider.
For example:
Website: New hosting provider
Email: Existing email provider
Domain: Existing registrar
You do not necessarily need to move all three.
The mistake is changing DNS without understanding which records belong to which service.
9. Prepare DNS Before the Migration
DNS information is cached.
That means a DNS change does not necessarily reach every network at exactly the same time.
One way to prepare for a planned hosting migration is to lower the DNS TTL before the move.
Google currently recommends considering a lower TTL, such as a few hours, ahead of the migration so DNS caches refresh more quickly.
The important thing is to prepare before the DNS switch.
Do not wait until migration day to start thinking about DNS.
10. Perform a Final Backup or Data Sync
This step becomes particularly important if your website changes frequently.
Imagine you run an online store.
You copy the website to the new server on Monday.
Between Monday and Wednesday, customers place 25 orders.
If you switch to the new server without transferring those latest changes, your new website may not contain all the current data.
The same issue can happen with:
- Customer registrations
- Bookings
- Enquiries
- Comments
- Product updates
- Inventory changes
For a static company website, this may be less important.
For a dynamic website, you should plan a final synchronisation before the cutover.
11. Choose the Right Time to Switch
If your website generates significant business activity, avoid switching during your busiest period.
For example, if most enquiries arrive during business hours, a migration can be planned outside the busiest window.
For an e-commerce website, the migration requires more careful planning because transactions can happen at any time.
The objective is simple:
Reduce the business risk while the DNS change takes effect.
12. Change the DNS to the New Hosting
Once the new website has been fully tested, change the DNS records required to point your domain to the new hosting provider.
Depending on your setup, you may need to change:
- A record
- AAAA record
- CNAME
- Nameservers
The correct option depends on your domain and hosting configuration.
This is the point where traffic starts moving from the old hosting environment to the new one.
Google describes the DNS change as the step that starts the actual hosting move.
13. Keep the Old Hosting Active
This is one of the simplest ways to reduce migration risk.
Do not cancel your old hosting immediately.
Keep the old website available while DNS changes propagate.
Monitor:
- Website traffic
- Server logs
- Forms
- Orders
- Bookings
- SSL
- Analytics
- Website errors
Google specifically recommends monitoring both old and new hosting infrastructure and only shutting down the old hosting once you are confident that users and Googlebot are receiving the website correctly from the new infrastructure.
14. Check Your Website After Migration
Once the DNS change is underway, test the website again.
Look for:
Broken pages
Make sure important URLs still open.
Missing images
Check that images and other media were transferred correctly.
Broken forms
Submit your contact and enquiry forms.
Email problems
Send and receive test emails if email was affected by the migration.
SSL problems
Check HTTPS across important pages.
Performance problems
Compare loading and server response with the previous hosting environment.
Analytics
Make sure your analytics tracking is still working.
Do not assume everything is fine just because the homepage loads.
Will Changing Hosting Affect Your Google Rankings?
This is one of the biggest concerns businesses have when they migrate a website to new hosting.
If you are changing only the hosting infrastructure while keeping your domain and URLs the same, the process is different from changing your domain or URL structure.
Google has a specific guide for changing hosting infrastructure without changing user-visible URLs. Its recommended process is to prepare and test the new hosting, change DNS, monitor the transition and then shut down the old hosting after the move is stable.
There can still be temporary changes in Google’s crawling activity after a hosting change. Google says a temporary change in Googlebot crawl rate can occur after changing hosting infrastructure.
To reduce unnecessary SEO risk:
- Keep your URLs the same
- Keep important content unchanged
- Make sure pages remain accessible
- Check robots.txt
- Check for accidental noindex settings
- Check your XML sitemap
- Monitor Google Search Console
- Monitor organic traffic
- Check important landing pages
Do not combine a hosting migration with a complete website redesign unless you have a reason to do both at the same time.
Changing one major thing at a time makes problems much easier to identify.
What About Business Email?
This is one area that business owners often overlook.
Your website hosting and email hosting can be completely separate.
If your business email is working through your existing provider, you may not need to move the mailboxes at all.
Before changing DNS, identify the records responsible for email.
These can include:
- MX
- SPF
- DKIM
- DMARC
If you are unsure what these records do, get technical help before changing them.
A successful website migration that breaks your business email is not a successful migration.
Common Website Migration Mistakes
Cancelling the old hosting too early
Keep it active until the new website is confirmed.
Changing DNS before testing
Always test the new hosting environment first.
Forgetting the database
Website files and databases are not always the same thing.
Forgetting email
Your website may move while your email remains elsewhere.
Forgetting SSL
HTTPS needs to work on the new server.
Not testing forms
A website can look perfect while the enquiry form is broken.
Not checking mobile
Test the website on mobile after migration.
Changing too many things at once
If possible, do not change hosting, domain, URLs and website design simultaneously.
Not having a backup
Always have a recovery option before beginning.
Website Migration Checklist
Use this checklist before you migrate your website to new hosting.
Before migration
- Identify why you are changing hosting
- Choose the right hosting plan
- Create a complete website backup
- Back up the database
- Record DNS settings
- Record email settings
- Prepare the new hosting account
- Prepare DNS TTL
During migration
- Transfer website files
- Transfer database
- Configure the new server
- Configure SSL
- Test important pages
- Test forms
- Test payments
- Test login
- Test mobile
- Perform final data sync if required
- Change DNS
After migration
- Check website availability
- Check SSL
- Check forms
- Check email
- Check payments and bookings
- Check analytics
- Check Search Console
- Monitor traffic
- Monitor server errors
- Keep old hosting active
- Cancel old hosting only after the migration is confirmed
Should You Migrate Your Website Yourself?
It depends on the website.
A small static business website may be relatively simple to move.
A WordPress website requires more care.
An e-commerce website, membership website or custom application can be considerably more complicated.
Consider professional migration support if your website:
- Generates regular leads
- Processes payments
- Has customer accounts
- Receives high traffic
- Contains important business data
- Uses several integrations
- Has a large database
- Cannot afford downtime
The cost of migration should also be compared with the potential cost of an unsuccessful migration.
If your website generates business every day, spending a little more to reduce migration risk can be more sensible than choosing the cheapest possible option.
What Is the Best Approach for an SME?
For most small and medium-sized businesses, you do not need to understand every technical detail of a hosting migration.
You need to make sure the right questions are being answered:
Will my website remain available?
Will my forms and enquiries continue working?
Will my email continue working?
Will my website data be safe?
Will my Google rankings be protected?
Can the new hosting handle my future traffic?
Those are the questions that matter to the business.
The technical team or hosting provider can handle the underlying migration process.
Frequently Asked Questions
How do I migrate my website to a new hosting provider?
Back up your website, prepare the new hosting account, transfer your files and database, test the new website, prepare DNS, change DNS to the new server and monitor both hosting environments before cancelling the old one.
Can I migrate my website without downtime?
Yes. A carefully planned hosting migration can minimise or avoid visible downtime. The most important step is to prepare and test the new hosting before changing DNS.
Will I lose SEO rankings if I change hosting?
Changing hosting alone does not automatically mean losing rankings. Keeping the same domain, URLs and content reduces the complexity of the move. Continue monitoring Google Search Console and organic traffic after migration.
How long does website migration take?
It depends on the size and complexity of your website. A simple website can be relatively quick to move, while an e-commerce website or custom application may require more preparation and testing.
Should I cancel my old hosting after migration?
No. Keep the old hosting active until you have confirmed that DNS has moved, the new website is working and important business functions are operating correctly.
Do I have to move my email when I change hosting?
No. Your website hosting and email hosting can be separate. If your email remains with the existing provider, make sure its DNS records are preserved.
Can a WordPress website be migrated to new hosting?
Yes. A WordPress website can be migrated using a plugin, hosting migration service or manual process. The important thing is to transfer both the website files and database and test the new environment before switching DNS.
Final Thoughts
Changing your hosting provider does not have to become a website disaster.
The safest way to migrate your website to new hosting without downtime is to treat the process as a planned business transition.
Back up your website. Choose hosting that can support your future growth. Prepare the new server. Transfer your website. Test it before changing DNS. Check your email and SSL. Prepare your DNS. Perform a final data sync when necessary. Then switch traffic and monitor the old and new environments.
Most importantly, do not shut down the old hosting before you know the new hosting is working properly.
Your hosting may be changing, but your customers should not have to notice.
WebDreams Perspective
At WebDreams, we believe a hosting migration should solve a business problem, not create a new one. Whether you are moving because of slow performance, limited resources, poor support or future growth, the right hosting environment and a properly planned migration can help keep your website reliable while you move forward.
Choose the Right Hosting Plan
Once you know why you are migrating, choose the new hosting environment. Look at more than the monthly price. Consider server resources, storage, scalability, security, support and compatibility with your website.
If you are comparing hosting options for your website, you can also explore the WebsiteDomains, web hosting plans to see the available hosting options before making your decision.